This post will help you with SSL Configuration to enable HTTPS Apache Web Server on Linux.
If you are interested in learning, Request you to go through the below recommended tutorial.
DevOps Full Course Tutorial for Beginners - DevOps Free Training Online
Docker Full Course Tutorial for Beginners - Docker Free Training Online
Kubernetes Full Course Tutorial for Beginners - Kubernetes Free Training Online
Ansible Full Course Tutorial for Beginners - Ansible Free Training Online
Openstack Full Course Tutorial for Beginners - Openstack Free Training Online
This article describes you how to setting up or enable Apache HTTPS (SSL) Web server with self-signed SSL certificate on Linux (RHEL7 / CentOS 7). A self-signed certificate will not validate the identity of your server, since it is not signed by a trusted certificate authorities, but it will allow you to encrypt communications between your server and your visitors.
SSL Configuration to enable HTTPS Apache Web Server on Linux
Lab Server Setup:
Hostname : node1.learnitguide.net
IP Address : 192.168.2.102
Operating System : CentOS 7.2 - 64 Bit
Prerequisites:
1. We must have configured Apache HTTP Web Server, Refer this link to Install and configure Apache HTTP Web server on Linux.
2. Yum Repo must be enabled to install the required packages. Refer this link to configure the Yum Repo Server - Configure YUM Repo Server on Linux.
Required Packages : mod_ssl
Default config file: /etc/httpd/conf.d/ssl.conf
Default ports: 443 (SSL)
Once your Apache HTTP Web Server is ready, Use the following instructions to setting up the Apache HTTPS (SSL) Web Server on RHEL7 / CentOS7.
1. Install SSL Module.
Install the appropriate package "mod_ssl" using yum to avoid dependencies issue.
[root@node1 ~]# yum -y install mod_ssl
Apache Web server will be able to start using an SSL certificate after the httpd service is restarted.
2. Generate New SSL Certificate.
The certificate will store some basic information about our site, and will be accompanied by a key file that allows the server to securely handle encrypted data. You can also create a dedicated directory for each websites and keep the certificates safely if you hosted multiple websites on a single node. use "openssl" utility to create the SSL Certificate.
[root@node1 ~]# openssl req -new -x509 -nodes -out /etc/pki/tls/certs/learnitguide.net.crt -keyout /etc/pki/tls/private/learnitguide.net.key -days 365
After we enter the request, this will prompt for a input where we can enter needed information about our website.
Country Name (2 letter code) [XX]:
State or Province Name (full name) []:
Locality Name (eg, city) [Default City]:
Organization Name (eg, company) [Default Company Ltd]:
Organizational Unit Name (eg, section) []:
Common Name (eg, your name or your server's hostname) []:node1.learnitguide.net
Email Address []:
Replace "node1.learnitguide.net" with your server name.
Edit the /etc/httpd/conf.d/ssl.conf file, search for the SSLCertificate string and replace as follows:
SSLCertificateFile /etc/pki/tls/certs/learnitguide.net.crt
SSLCertificateKeyFile /etc/pki/tls/private/learnitguide.net.key
Search for the directive "ServerName" in the same file and replace with your server name instead of "node1.learnitguide.net".
ServerName node1.learnitguide.net:443
3. Restart httpd service.
[root@node1 ~]# systemctl restart httpd
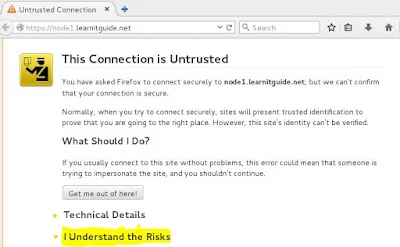
Open the browser from client and enter the URL https://node1.learnitguide.net. you could see the message as "This Connection is Untrusted" as shown in the below image.
Just click "I undestand the Risks" and Select "Add Exception". This will popup an box as shown in the below image.
Just select "Confirm security exceptions". That's all about setting up Apache Web Server with https (SSL) on Linux Servers.
Also refer other Apache related articles,
Apache Virtual Host Configuration to run Multiple Websites
How to Configure Apache HTTP Web server on RHEL7 / CentOS7
Keep practicing and have fun. Leave your comments if any.
Support Us: Share with your friends and groups.
Stay connected with us on social networking sites, Thank you.
ssl configuraion, setup https apache, enable https in apache linux, apache ssl installation, how to configure https on apache, enable ssl for apache


0 Comments