In this post, we will provide you the step by step procedure of how to create route tables and assign subnets in AWS.
A route table contains a set of rules, called routes, that are used to determine where network traffic is directed.
Each subnet in your VPC must be associated with a route table; the table controls the routing for the subnet. A subnet can only be associated with one route table at a time, but you can associate multiple subnets with the same route table.
AWS VPC - Create Route Tables and Assign Subnets in AWS
To make you understand better, lets have a sample VPC architecture as shown in below image as our requirement.- 1 VPC (10.0.0.0/16)
- 2 Subnets - Public Subnet (10.0.1.0/24) and Private Subnet (10.0.2.0/24)
- 1 Internet Gateway attached to Public Subnet.
- How to create a New VPC?
- How to create Internet Gateway and attach to newly created VPC?
- How to create Public Subnet and Private Subnet?
In this post, we will cover only,
- How to create Route Tables for Public and Private Subnet?
- How to edit Route Tables?
- How to add Internet Gateway route to Public Route Table?
- How to Associate Public and Private Subnets to respective Route Tables?
Note : In order to create and manage any AWS Services, we must have some valid users created with IAM policy defined. Else you wont have a access to these AWS services.
Login into AWS Management Console.
I have created my VPC in US East (N. Virginia) region, So, make sure you are in the right region.
How to create Route Tables for Public and Private Subnet?
Go to "Route Tables" section from the left side panel.
Create Public Route Table:
By default, one route table is created and attached to VPC. Let's modify the tag name, attach the Internet Gateway to this route table and add the public subnet to it.
Select the route table, pull down "actions" button and select "Add/Edit tags".
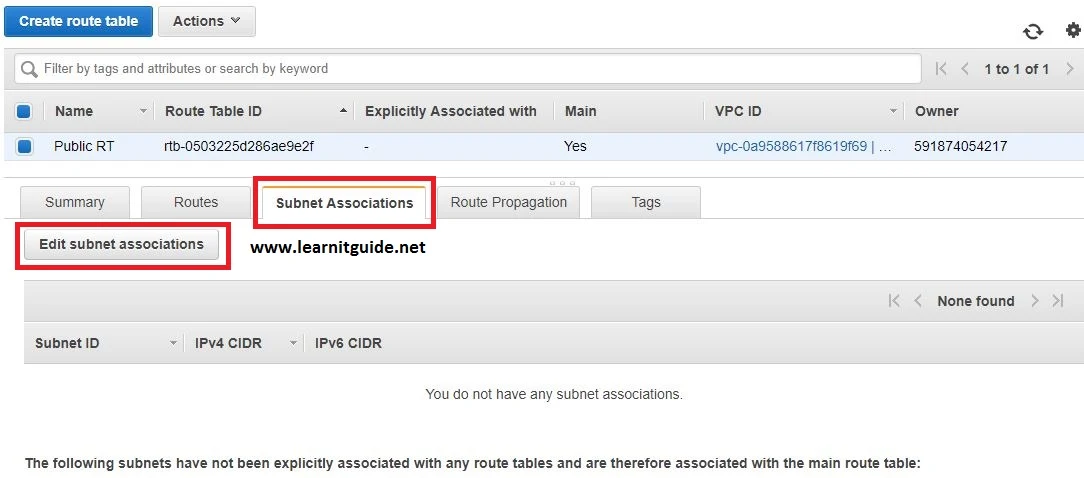
Click "Edit Subnet Associations", mark only the correct "Public Subnet" which we have created and click "Save".
Select the Private Route Table now and go to Subnet Association section. Click "Edit Subnet Associations".
That's it for this post, hope you have got an idea on the below topics.
- How to create Route Tables for Public and Private Subnet?
- How to edit Route Tables?
- How to add Internet Gateway route to Public Route Table?
- How to Associate Public and Private Subnets to respective Route Tables?
Refer the previous post (AWS VPC | Create New VPC, Subnets, Internet Gateway ) where we have covered,
To protect the AWS resources in each subnet, We can use multiple layers of security, including security groups and network access control lists (ACL).
Also Request you to go through the below recommended tutorial, if you are interested in learning.
- How to create a New VPC?
- How to create Internet Gateway and attach to newly created VPC?
- How to create Public Subnet and Private Subnet?
To protect the AWS resources in each subnet, We can use multiple layers of security, including security groups and network access control lists (ACL).
Also Request you to go through the below recommended tutorial, if you are interested in learning.
DevOps Full Course Tutorial for Beginners - DevOps Free Training Online
Docker Full Course Tutorial for Beginners - Docker Free Training Online
Kubernetes Full Course Tutorial for Beginners - Kubernetes Free Training Online
Ansible Full Course Tutorial for Beginners - Ansible Free Training Online
Openstack Full Course Tutorial for Beginners - Openstack Free Training Online
Keep practicing and have fun. Leave your comments if any.
Stay connected with us on social networking sites, Thank you.


0 Comments