This post will show you How to Configure IP Address on Ubuntu using Netplan.
If you are interested in learning, Request you to go through the below recommended tutorial.
DevOps Full Course Tutorial for Beginners - DevOps Free Training Online
Docker Full Course Tutorial for Beginners - Docker Free Training Online
Kubernetes Full Course Tutorial for Beginners - Kubernetes Free Training Online
Ansible Full Course Tutorial for Beginners - Ansible Free Training Online
Openstack Full Course Tutorial for Beginners - Openstack Free Training Online
Ubuntu has recently moved to Netplan, So we have to use Netplan for network configuration from Ubuntu 18.04, Ubuntu 20.01 and newer Ubuntu releases too. Netplan is based on YAML based configuration system that makes our network configuration steps very simple and efficient. And also Netplan has replaced old network configuration file /etc/network/interfaces that we previously used for configuring network interfaces on Ubuntu.
Still we have /etc/network/interfaces, but we could see the messages on top of the file like ifupdown has been replaced by netplan.
Also You can watch this tutorial demo video on our YouTube Channel.
Lets get started.
How to Configure IP Address on Ubuntu using Netplan
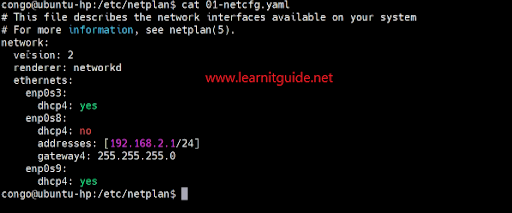
Netplan Configuration files will be available under /etc/netplan/ directory, all these files should be only created in yaml syntax.
There will be a default yaml file and the content will be like this below.
Lets see how to write these network configuration using netplan yaml files and how to get help of netplan examples.
This netplan manual page has lot of informations about all the options with examples where we could find options like, dhcp4, dhp6, gateway4, gateway6, nameserver, addresses, etc,.
$man netplan
Get some examples and related options as per your requirement and make changes on the network yaml files.
Once the changes are modified, Apply the changes.
Netplan has two options, netplan try and netplan apply.
netplan try - this command will help you to check syntax error and will give some options with timeout to proceed or not.
netplan apply - this command will apply the changes.
That’s it. Hope you have got an idea, How to Configure IP Address on Ubuntu using Netplan.
Also Request you to go through the below recommended tutorial, if you are interested in learning.
DevOps Full Course Tutorial for Beginners - DevOps Free Training Online
Docker Full Course Tutorial for Beginners - Docker Free Training Online
Kubernetes Full Course Tutorial for Beginners - Kubernetes Free Training Online
Ansible Full Course Tutorial for Beginners - Ansible Free Training Online
Openstack Full Course Tutorial for Beginners - Openstack Free Training Online
Docker Full Course Tutorial for Beginners - Docker Free Training Online
Kubernetes Full Course Tutorial for Beginners - Kubernetes Free Training Online
Ansible Full Course Tutorial for Beginners - Ansible Free Training Online
Openstack Full Course Tutorial for Beginners - Openstack Free Training Online


0 Comments